

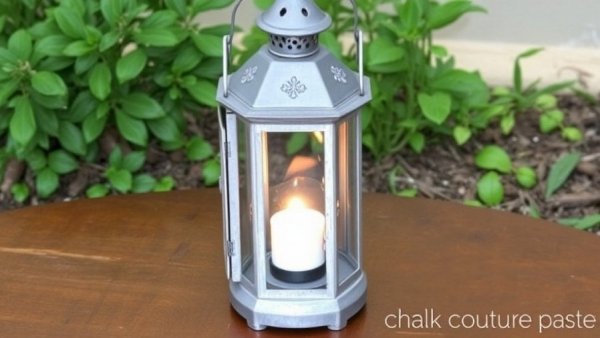
The Charm of a Dollar Tree Lantern Makeover
Transforming a simple plastic lantern into a charming Christmas decoration is a delightful project to embrace, especially for homeowners looking to enhance their living spaces during the festive season. With just a few materials and some creativity, the Dollar Tree Flame Glow Lantern can be elevated into a sophisticated accent piece that captures the holiday spirit.
Materials You Need for a Stunning Transformation
Your first step involves gathering everything you need for this makeover. In addition to the plastic lantern, you'll want Chalk Couture paste in black and a metallic shade like My 2¢, which mimics the look of aged metal. Don't forget to pick up some greenery and accents such as red berries, which can create an inviting seasonal feel. These materials are affordable and easily sourced from your local Dollar Tree, keeping your project budget-friendly while maximizing your creativity.
Preparing the Lantern: Your First Step to Success
The look you create is only as good as the preparation you undertake. Begin by lightly sanding the plastic surface of your lantern to allow the paste to grip better. This step is crucial; it gives the lantern a textured surface that enhances the finished look. Remember, you're aiming to scuff rather than reshape, which will make the subsequent layers sit beautifully on top.
Painting with Chalk Couture: A Smooth Finish
Once your lantern is sanded, it's time to apply the first coat of your black Chalk Couture paste. This step is where your lantern begins to take on a new character. The flatter, matte finish of the paste will help disguise any remaining glossy areas of the plastic, making it appear more like painted metal. Be sure to do a quick check with the fingernail test after the first coat to ensure it’s dried and ready for the next exciting phase of the project.
Creating a Beautifully Weathered Look
This is where your creative instincts come into play – apply the metallic paste selectively, brushing it onto random areas of the lantern. The contrast between the flat black base and the hints of metallic will mimic the look of an aged piece, as if it’s spent seasons outdoors. This approach infuses warmth and depth into the lantern, turning it not just into a decoration but a conversation piece.
Embellishing with Greenery and Colorful Touches
Now that the base is beautifully finished, it's time to add some festive decor! Use both eucalyptus and red berries to create an eye-catching design on the lantern. Being asymmetrical is not only okay, it's preferred. This allows the greenery to form a soft, natural look that complements the overall rustic style of the lantern.
Why DIY Projects are Good for the Soul
Engaging in DIY projects like this makeover can be incredibly fulfilling. Not only do you end up with a unique decor item, but the process of crafting can also reduce stress, improve mental clarity, and enhance your sense of achievement. This project allows you the freedom to express your creativity while also promoting mental wellness – a win-win!
Final Thoughts: Celebrate Your Creativity!
Your finished lantern will not only add charm to your home during the holidays but will also serve as a testament to your creativity and ability to enhance your living space. When you invest time in DIY projects, you not only create functional items but also weave memories that will be cherished for years to come. So, embrace your creativity today and give your home the festive touch it deserves!


Write A Comment