
cropper
Raleigh Better Home Living
  • Home
  • Categories
    • DIY Projects
    • Smart Home Tech
    • Home Maintenance
    • Interior Design
    • Lawn and Garden
    • Design Trends
    • Draft or Deletes
  • Adding Value to Your Home
  • Feature Local Businesses
November 13.2026
3 Minutes Read

Unleash Your Creativity: How to Make a Sublimation Shirt at Home

How to Make a Sublimation Shirt at Home

Unleashing Creativity: Your Guide to Making Sublimation Shirts at Home

Sublimation printing isn't just a trend; it’s a way to express your personality through custom clothing. As the winter season approaches, there's no better time to create seasonal shirts that make a statement. I recently crafted a charming snowy-themed shirt featuring the design from Snowy’s Creamery, blending warmth and style into one cozy piece perfect for chilly afternoons. If you're considering diving into sublimation, this guide will walk you through all the steps to craft your own special piece without a hitch.

Why Choose Sublimation for Your DIY Projects?

Sublimation printing offers an exciting array of advantages for DIY enthusiasts. Unlike traditional printing, sublimation uses heat to transfer dye onto fabrics, creating a vibrant, long-lasting design that feels like part of the fabric itself. This method is especially suitable for light-colored materials, maximizing color vividness.

Moreover, it allows for intricate designs to be printed without the limitations that usually come with other printing methods. For instance, my Snowy’s Creamery design brings all the winter vibes to life with its playful theme and vivid colors. It’s not just a shirt; it’s a canvas for creativity.

The Importance of Fabric Choice in Sublimation

When embarking on a sublimation project, fabric content matters deeply. Ideally, you'll want to choose shirts with a higher polyester content due to its capacity to hold dye. For example, my chosen shirt, which is 62% polyester, worked wonders. Previously, I’ve used shirts with as much as 65% polyester and found that they offered even better results in terms of brightness and clarity of the print.

Additionally, remember that sublimation works best on white or light-colored fabrics. The absence of a white base means the vibrant colors of your design will shine through, whereas darker colors tend to obscure the ink, resulting in duller designs.

Selecting the Right Tools and Supplies

Before starting, make sure to gather all necessary supplies. Here’s what I used for my project:

  • Light 62% polyester shirt
  • Snowy’s Creamery sublimation design
  • Heat press
  • Heat-resistant tape
  • A wool mat for pressing
  • Parchment paper for added security

Having everything ready will streamline the process and eliminate potential hiccups along the way.

Preparing Your Shirt for Sublimation

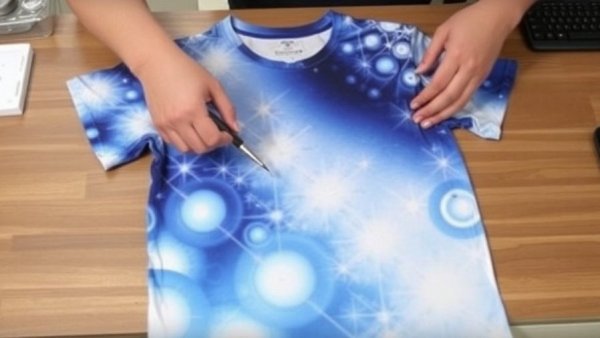
Preparation is key to achieving excellent results. To start, lay your shirt flat on the wool mat and smooth out any wrinkles. This step is crucial for ensuring even contact between the design and fabric. For thinner shirts, placing a piece of parchment paper inside may help prevent any dye from bleeding through onto the back side.

Once you’ve prepped, carefully position the sublimation design where you want it. Remember, the sublimation process is permanent, so take your time to ensure everything is perfectly aligned.

Pressing the Design: Tips and Techniques

Next, it’s time to get pressing! Heat your press to 360 degrees Fahrenheit and set the time to 60 seconds, as per the instructions from the design package. After the initial press, take a peek. If certain areas, like the reds in my design, aren’t vibrant enough, don’t hesitate to press them again.

Be mindful of how hot everything gets and maintain a secure hold on the design. Any movement can lead to smudged images or shadowing effects, which are best avoided.

The Joy of a Custom Creation

The sense of accomplishment that comes with making something unique is gratifying. Creating my Snowy’s Creamery shirt not only gave me a wearable piece of art to enjoy throughout winter but also offered me the chance to connect more deeply with my creative side. When you approach sublimation, you’re not just crafting garments; you’re creating memories and infusing personal touches into your wardrobe.

Final Thoughts: Why Every Home Should Embrace DIY Sublimation

With winter here, why not embrace the warmth and creativity that custom sublimation shirts can bring to your life? By investing in the right tools and techniques, you can turn any simple shirt into your favorite winter wear. There’s immense joy in wearing something you’ve made yourself, and it’s a fantastic conversation starter!

So gather your supplies and get started on your sublimation journey today. Inspire yourself and those around you with your creative flair!


Interior Design

0 Views

0 Comments

Write A Comment

*
*
Please complete the captcha to submit your comment.
Related Posts All Posts
11.12.2026

Create a Stunning Christmas Stamp Ornament for Your Holiday Decor

Update Transform Your Holiday Decor With a DIY Christmas Stamp Ornament It's that time of year again when we start thinking about how to make our homes feel festive for the holidays. This DIY Christmas stamp ornament project is a fun and creative way to add a touch of personalization to your Christmas decorations. Using Chalk Couture products, you can create a beautiful, oversized ornament that not only showcases your unique style but can also spark joy with its bright colors and holiday-themed design. The Supplies You’ll Need for This Project To make your own version of this project, you’ll need a few basic supplies. The main items include:- Chalk Couture Christmas Stamp transfer- Matching wooden cutout- Bright White and Cherry chalk paste- Surface wax- Fuzzing cloth- Squeegee- Hole punch- Silver wire- A Posca pen (or alternative like a pencil or paintbrush handle) for curling the wire These supplies ensure the project remains straightforward, and Chalk Couture’s reusable transfers let you experiment with designs over and over again. Step-by-Step Guide to Crafting Your Ornament Let’s break down the crafting process into manageable steps: Painting the Wood Cutout: Start by painting your wooden cutout with Bright White chalk paste. Use a squeegee to spread the paste evenly, ensuring thorough coverage.This step creates a bright background for the Cherry design to stand out. Preparing for the Transfer: Once the white background dries, apply a light layer of surface wax for protection. This step prevents the transfer from adhering too strongly to the wood, preserving the base color. Lining Up the Design: Center your Chalk Couture transfer over the wooden cutout and press down. Pay attention to the screened areas, ensuring contact for an even application. Applying the Cherry Chalk Paste: With Cherry paste, use a light touch on the squeegee to apply it over the design. Moving quickly prevents the paste from drying before your reveal. The Magical Reveal of Your Creation One of the most exciting parts of the process is the reveal. As you slowly lift the transfer away from the wood, watch your design come to life! This tension between anticipation and creativity transforms crafting into a delightful experience. If you notice any missed areas, you can gently place the transfer back and apply more paste for a seamless finish. Personalizing Your Ornament This project allows not only creativity but personal storytelling. As you hang your ornament on the tree or wreath, you can think of it as a reflection of your personal style and family traditions. Whether you choose to place it in the kitchen or a more prominent spot on your tree, this ornament can become a cherished holiday decoration. Getting Creative: A Unique Twist on Decoration For those with a flair for creativity, you can explore variations on design and color. Consider adding glitter or additional embellishments for a more dynamic look. This can bring a new twist to your holiday decor and invoke the spirit of playful crafting with family and friends. Why DIY Matters This Holiday Season Amid the busyness of the holiday season, taking the time to create something with your hands can be incredibly fulfilling. DIY projects provide not just a creative outlet, but they also contribute to a sense of accomplishment and well-being. They foster deeper connections as you engage with loved ones in crafting sessions, sharing laughter and stories along the way. Invitation to Craft Together So, gather your loved ones and try out this fun DIY project together! Crafting can become a memorable tradition, where each ornament tells a story and enhances your home's festive atmosphere. Let’s spread warmth this holiday season by adding unique personal touches to our celebrations!

11.11.2026

Create Your Own Christmas Cheer with a DIY Chalk Couture Canvas

Update The Charm of DIY Holiday Decor As the holidays approach, many homeowners find joy in creating personalized pieces that add warmth and character to their celebrations. A beautiful Christmas canvas, like the one I created using Chalk Couture, not only enhances holiday decor but also provides a wonderful opportunity for engaging creativity. This year, I decided to make a large black and white canvas featuring a snowy village with Santa soaring across the night sky, inspired by classic holiday aesthetics. An Affordable Canvas for Every Home To start this enchanting project, I chose an 18 by 24 artist canvas – a budget-friendly option that offers ample space for artistic expressions. This size is perfect for drawing attention on a mantel or filling a blank wall in your entryway. The simplicity of the canvas allows for easy modifications and is adaptable to any home’s decor style. Crafting a Winter Wonderland Scene When painting the canvas, I applied a matte black acrylic paint to set the stage for my winter wonderland. This dark background not only highlights the pristine white colors of the village and Santa but also evokes the nostalgic feeling of classic holiday films. It’s important to vary the paint coverage slightly to create depth, mimicking the natural nuances of a night sky. Transferring Your Vision to Canvas Using the Chalk Couture transfers, I meticulously placed the **Christmas Village** design at the bottom of the canvas. Ensuring a good seal around detailed areas helped prevent any mishaps with the paste. After applying the **Bright White Chalk Paste** and quickly lifting the transfer while wet, I was thrilled to see the village come to life. This engaging method not only saved cleanup time but also preserved the crisp details that make DIY projects standout. Completing the Scene with Santa Next, I positioned the enchanting Santa and reindeer transfer against the canvas' open sky, giving the impression that Santa was just taking flight. The effect of a unified black-and-white theme brought the entire scene together, rallying holiday spirit in a meaningful way. One tip I ensure to share: always lift your transfer before the paste dries to keep those intricate details sharp! Adding the Finishing Touches To evoke a soft snowfall, I added additional white dots using the handle of a paintbrush. This fun technique allowed me to control the sizes of the falling snowflakes, ensuring they matched the canvas’ scale beautifully. Incorporating this small but significant detail provides a dynamic aesthetic to the overall piece. Why DIY Projects Matter Engaging in DIY decorations not only fosters creativity but also cultivates a sense of fulfillment by making your home uniquely yours. It’s about transforming personal spaces into cozy havens that reflect who we are. Moreover, such projects can also be wonderful bonding opportunities for family and friends, allowing shared experiences during the festive season. Join the DIY Revolution Ready to create your holiday masterpiece? Dive into your own chalk couture project this Christmas and enjoy the process of crafting something beautiful for your home. Whether it’s a large canvas or small accents throughout the house, each piece adds layers of warmth and cheer to your holidays. Don't forget to share your creations online and inspire others to join the fun!

11.10.2026

Create a Cozy Gathering Space with a DIY Farmhouse Sign Using Chalk Paste

Update Transforming a Blank Slate into a Cozy Statement Piece Creating a rustic farmhouse sign with chalk paste is not only a straightforward DIY project but also a wonderful way to add a personal touch to your home. This project uses the Chalk Couture chalk paste to craft a sign that evokes warmth and invites gatherings, perfect for creating a cozy atmosphere. Materials You'll Need for a Stunning DIY Sign To dive into your own farmhouse sign project, gather the following supplies: a large scalloped surface (at least 19 inches), Vanilla chalk paste, a damp sponge, a Posca paint pen, sandpaper, clear wax, and a fuzzing towel. Don't forget the essential design elements, like the Gathering Place transfer, My Two Cents metallic paste, and decorative extras such as ribbon and wire to enhance your final masterpiece. Step-by-Step Guide to Creating Your Rustic Sign 1. **Paint the Base**: Begin by painting your large scalloped surface with Vanilla chalk paste. This fast-drying material helps to build a rustic feel, especially when leaving some brush strokes visible. A second coat can provide good coverage for a more cohesive look, prepping the surface for further customization. 2. **Add Faux Shiplap Lines**: To emulate the beloved shiplap trend, use your long straight board as a guide to draw lines across the surface. This step adds a bit of character—lightly sand these lines afterwards for an aged appearance. 3. **Apply Clear Wax**: To prevent your transfer from sticking too firmly to the painted background, rub a small amount of clear wax over your surface. This will help ensure a successful design application. Bringing your Design to Life with Chalk Transfers Now comes the exciting part! Position your reusable Gathering Place transfer on your freshly painted surface. Center it by eye, making sure it adheres flatly without any bubbles. This transfer features the charming phrase, "The gathering place where friends become family," making it a versatile addition to your home decor. Adding a Touch of Metallic Elegance For the lettering, use My Two Cents metallic paste to provide a gorgeous contrast against the Vanilla background. The warm copper hue pops beautifully and instantly elevates the rustic charm of your sign. Use a small squeegee to apply the paste, ensuring it fills the silkscreen design perfectly before lifting the transfer to reveal the polished letters. The Final Touch: Softening and Enhancing Your Signage After lifting the transfer, you may want to soften the edges slightly to maintain that rustic aesthetic. This can be done by gently sanding the surface around the lettering to blend everything seamlessly and produce a harmonious look. Consider adding a simple bow or a small wreath above your sign to complete the farmhouse ambiance. Why DIY Projects Matter for Homeowners Engaging in DIY projects like creating a farmhouse sign not only beautifies your home but also provides a fulfilling creative outlet. Home design is a form of expression that allows you to showcase your personality and values. Furthermore, these projects can foster a sense of community when shared with friends and loved ones, making your space not just visually appealing, but also a gathering place for cherished memories. Are you ready to roll up your sleeves and start crafting? Transform your space with a touch of rustic elegance that tells a story—your story. Start your DIY journey today and create a sign that will truly become a focal point in your home!

Raleigh Better Home Living

Discover Essential DIY, Landscaping, Maintenance, and Design Tips for Raleigh Metro Homeowners on Our Media Site!

Green Street Constulting LLC

864 535 6456

AVAILABLE FROM 8AM - 5PM

ABOUT US

Empowering Raleigh Metro Homeowners: Discover the Latest Articles and YouTube Videos for Home Improvement Tips!

© 2026 CompanyName All Rights Reserved. Address . Contact Us . Terms of Service . Privacy Policy

Terms of Service

Privacy Policy

Core Modal Title

Sorry, no results found

You Might Find These Articles Interesting

T
Please Check Your Email
We Will Be Following Up Shortly
*
*
*