Add Row
Add Element
cropper
update
Raleigh Better Home Living
update
Add Element
  • Home
  • Categories
    • DIY Projects
    • Smart Home Tech
    • Home Maintenance
    • Interior Design
    • Lawn and Garden
    • Design Trends
  • Adding Value to Your Home
  • Feature Local Businesses
July 22.2025
3 Minutes Read

Mastering Quick DIY Repair for Notched Floor Joists

Inspector-approved DIY repair for notched floor joists, showing metal reinforcement, wiring and pipes.

Understanding the Essentials of Joist Repair

For homeowners facing structural issues in their homes, especially those pertaining to floor joists, understanding quick methods for repair is crucial. As detailed in the video Quick DIY Repair for A Failed Inspection: Notched Floor Joist, securing a compromised joist can be both time and cost-effective when approached with the right knowledge and tools. Not only does effective repair ensure the structural integrity of your home, but it also aids in passing inspections without incurring substantial contractor fees.

In Quick DIY Repair for A Failed Inspection: Notched Floor Joist, the discussion dives into how homeowners can effectively address joist notching issues, exploring key insights that sparked deeper analysis on our end.

The Challenge of Notched Joists

Many homeowners may not be aware that notching a floor joist—necessary to accommodate plumbing or electrical lines—can significantly weaken its structural performance. In the referenced video, Scott illustrates his experience with a 2x8 floor joist that has been notched, which raised red flags during an inspection. This situation is not uncommon; understanding how to remedy such problems is vital for homeowners looking to maintain their property’s value and safety.

Innovative Solutions for Structural Stability

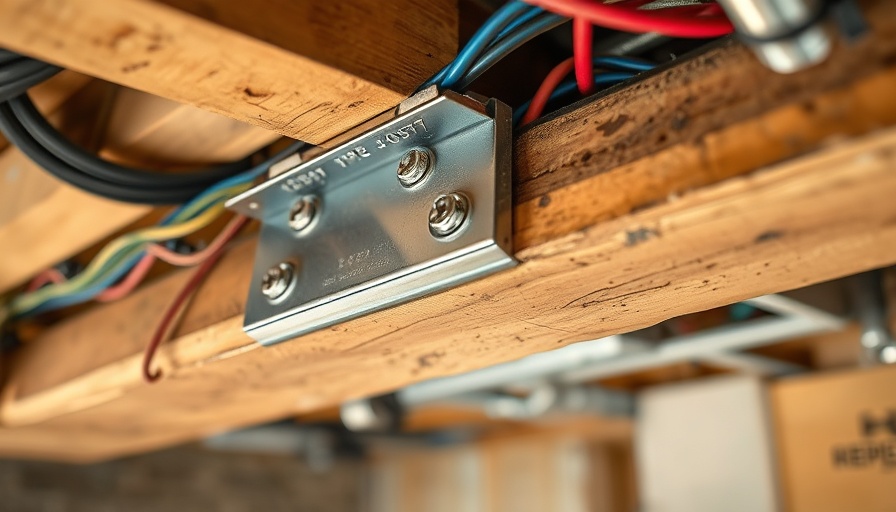
Fortunately, Scott discovered a solution: a specialized strap designed to reinforce notched joists without extensive renovations. This strap, which matches the width of standard joists, comes with multiple holes for secure fastening, providing a practical way to restore the joist’s strength. The installation process, as demonstrated in the video, takes about 15 minutes and requires minimal tools, making it an ideal DIY project.

Pilot Holes: The Key to Success

Key to the successful installation of this strap is the preparation of pilot holes. Homeowners should be cautious when working with existing wood to avoid splitting, a mistake that can nullify the repair's effectiveness. By drilling pilot holes, users can drive in fasteners without damaging the joist, ensuring a solid and enduring fix.

Alternative Solutions for Larger Notches

If the notch exceeds the strap’s capacity, there are other options available. The importance of adapting repair techniques to match the complexity of the damage cannot be overstated. Those with significantly larger notches can explore adjustable straps and support plates designed to enhance joist performance, further ensuring compliance with structural integrity standards.

Cost-Effective DIY Alternatives

Many homeowners remain unaware of the cost implications when hiring professionals for repairs. Between labor costs and potential materials, jobs like these could easily balloon into thousands of dollars. By utilizing smart DIY strategies and products like the strap mentioned by Scott, individuals can achieve structural repairs without breaking the bank. Moreover, being informed about these products can empower homeowners to tackle further repairs confidently.

Further Learning and Resources

Home maintenance can often be overwhelming, but it is also empowering. Scott encourages homeowners to explore resources like joisrepair.com, which offers a variety of structural solutions tailored for DIY enthusiasts. Whether it’s a simple notched joist repair or more extensive repairs due to water damage, having access to the right information is crucial.

Conclusion: Seizing the Initiative

With information and products available today, homeowners can take charge of their property maintenance effectively and affordably. The insights shared in Scott’s video not only inform about immediate solutions but also inspire confidence in tackling home repairs. For anyone managing similar issues, now is the time to act, leveraging DIY techniques to safeguard your home’s structural integrity. If you want to stay educated on home repair tactics, consider subscribing to Chris's channel for more insightful content.

Home Maintenance

4 Views

0 Comments

Write A Comment

*
*
Related Posts All Posts
12.07.2025

Insulating Your Walls: Costly Mistakes Homeowners Make

Update Choosing the Right Insulation for Your Home: A Cost and Value Comparison As homeowners often seek to maximize comfort and energy efficiency, understanding how to properly insulate walls can lead to significant savings in both heating and cooling costs. The video "Stop Wasting Money! Most Homeowners Are Insulating Walls Wrong" delves into this crucial topic, presenting various insulation options while analyzing their effectiveness and cost. So, which insulation method should you choose for your shed or garage? Let's break down the insights and findings.In the video 'Stop Wasting Money! Most Homeowners Are Insulating Walls Wrong,' Scott highlights vital insights into wall insulation options, prompting a deeper analysis of smart choices for insulation. Understanding Insulation Options: Rockwool, Fiberglass, and Spray Foam In the clip, host Scott reviews three primary insulation options: fiberglass, rockwool, and spray foam—two of which are traditional materials, with spray foam being a newer contender. Fiberglass insulation offers an R-value of approximately 13 and is widely recognized for its affordability and availability; however, it can be irritating to work with due to its itchy fibers. Rockwool, on the other hand, boasts an R-value of 15 and provides additional benefits such as moisture resistance and ease of handling, making it a more attractive option despite the higher cost. Further on, Scott introduces two spray foam products—Great Stuff and a more advanced Stanley kit—both designed to create an airtight seal. However, he highlights a shocking revelation: the dramatic cost differences among these options. While fiberglass insulation may cost around $18 to cover 32 square feet, spray foam can soar to a whopping $150, making it impractical for most DIY enthusiasts. This stark comparison invites homeowners to consider both performance and budget when choosing insulation solutions. Hidden Costs and Benefits of Insulation Choices When selecting insulation, it is crucial to consider not just the upfront costs but also the long-term benefits. For homeowners in the 40 to 65 age range, investing in higher-quality materials like rockwool could pay dividends in terms of reduced energy bills and improved comfort year-round. Although the initial investment may be higher, the potential for lower maintenance and less risk for issues such as mold growth is significant. Consider this: by using rockwool, you would not only sidestep the itchy fibers of fiberglass, but also create a more durable environment that repels moisture, which is particularly beneficial if you're storing valuable items in your shed. Cost-Effective DIY Strategies for Insulation For those eager to embrace DIY home repairs, it’s essential to arm yourself with knowledge before diving into any insulation projects. Homeowners should evaluate their specific needs, considering factors like the structure of the building and local climate conditions. In Scott’s video, he stresses the importance of proper application and technique. Whether you're choosing fiberglass or rockwool, ensure you handle the materials carefully to avoid reducing their effectiveness. Moreover, Scott's video provides excellent insights into tools and techniques that can help save both time and money. His step-by-step explanations guide viewers on how to approach projects methodically—an invaluable lesson for any DIYer. Taking Action: Your Pathway to Improved Home Insulation As a final note, the insights from Scott’s video serve as a springboard for homeowners looking to enhance their property's energy efficiency through proper insulation. Understanding the pros and cons of various materials can lead to informed choices that align with your budget and maintenance capacity. If you're considering an insulation project, utilize online resources, like videos and tutorials, to equip yourself with the knowledge necessary for successful implementation. Making educated decisions now can truly pay off in the long run. So, before you insulate your walls, take a moment to weigh your options. Consider the comparisons of cost, ease of installation, and the long-term benefits. For those interested in learning more and embarking on DIY projects, check out Scott's other videos to empower your home improvement endeavors. The right choices today can lead to significant savings and comfort tomorrow!

12.06.2025

Why Most Homeowners Insulate Shed Roofs Wrong: Key Insights for You

Update The Importance of Proper Shed Insulation When it comes to maintaining an optimal environment in your shed, proper insulation is key. Many homeowners mistakenly insulate their shed roofs without understanding the best practices, which can lead to numerous problems. Insulation not only helps regulate temperature but also protects the structure from moisture and pest infestations. Understanding how to insulate correctly can save you time, money, and frustration in the long run.In Most Homeowners Insulate Shed Roofs WRONG (Watch This!), the discussion dives into common errors made in shed insulation, prompting us to analyze critical elements to ensure optimal performance and efficiency. Common Mistakes Homeowners Make One common mistake is using the wrong type of insulation material or installation method. Many homeowners choose inexpensive materials that might not provide effective thermal resistance. Furthermore, failing to seal any gaps around insulation can lead to heat loss and excessive condensation. Think of it like wrapping a gift. If the wrapping paper has holes or tears, the present is no longer well-protected. The same goes for your shed; gaps in insulation lead to inefficiencies, making the structure more susceptible to extreme temperatures. Choosing the Right Insulation Material There are various insulation materials available, including fiberglass, foam boards, and spray foam. Each type has its advantages and disadvantages. For instance, fiberglass is affordable and widely used but can be difficult to install correctly without professional assistance. Spray foam, while more expensive, provides excellent coverage and air sealing, minimizing drafts. For homeowners aged 40 to 65, understanding these materials becomes crucial in making informed decisions. Investing in the right type of insulation can greatly increase your shed's functionality and lifespan. Benefits of Proper Shed Insulation Proper insulation not only maintains a stable temperature but also contributes to energy conservation. In colder climates, for example, insulated sheds can keep tools and equipment at optimal temperatures, preventing costly damage from freezing. In addition, insulating your shed can also increase its utility, allowing you to use it as a workspace or a comfortable retreat. Future Trends in Shed Insulation As the demand for eco-friendly building practices rises, more insulated products are becoming available, including recycled materials. Homeowners are increasingly seeking sustainable options that not only enhance efficiency but also minimize environmental impact. Moreover, as homeowners invest more in outdoor living spaces, the focus on multi-functional structures like sheds is growing. This means that better insulation is not just about maintaining temperatures; it's about creating versatile spaces. Making Informed Decisions Before starting your insulation project, assess your shed's needs. Consider factors such as size, climate, and intended use. While you might be tempted to cut costs with cheaper insulation, the benefits of quality materials far outweigh the initial investment. A well-insulated shed can lead to lower maintenance costs and enhance the overall value of your home, making it a wise investment for the future. Actionable Insights for Homeowners Now that you understand the importance of proper insulation, it’s time to act. Begin by researching the best insulation options for your shed and evaluating your local climate’s needs. Consult a professional if necessary, or find reliable DIY guides online to help you navigate the installation process. You're not just protecting your tools; you're increasing the longevity and utility of your shed. If you're passionate about home improvement and wish to bolster your property's value, exploring DIY projects like shed insulation can be an excellent step forward.

12.03.2025

Transform Your Shed: Avoid Common Insulation Mistakes for a Comfortable Space

Update Understanding the Importance of Proper Shed Insulation As you embark on the journey of transforming a simple storage shed into a comfortable workspace, recognizing the necessity for proper insulation becomes paramount. A well-insulated shed not only provides protection against extreme weather conditions but also enhances energy efficiency, leading to cost savings in the long run. Yet, many homeowners inadvertently make critical errors when insulating their shed roofs, which can result in costly repairs and health concerns due to mold and moisture.In 'Most Homeowners Insulate Shed Roofs WRONG (Do This Instead)', the video discusses crucial insulation techniques, prompting us to explore these insights further and analyze how they can help homeowners. The Right Materials for Insulating Your Shed In the quest for effective insulation, the material you choose plays a vital role. In a recent discussion, common insulation types were evaluated: fiberglass insulation, rockwool insulation, foam board, and spray foam. However, Scott from Everyday Home Repairs advocates for rigid foam board insulation, which gained significant popularity among viewers, especially for its ease of installation and cost-effectiveness. This foam board, with an R-value of 10, provides valuable thermal resistance, essential for maintaining a comfortable indoor environment. The price range of $350 to $400 for materials is a small investment for the benefits it yields. Scott emphasizes that opting for rigid foam boards prevents serious mistakes, particularly regarding ventilation, which this article will address. Avoiding Common Mistakes During Insulation One of the predominant errors homeowners make is overlooking the installation of adequate ventilation. Insulating a shed without ensuring proper airflow can trap moisture, creating a conducive environment for mold growth. For Scott’s shed, he successfully avoided this pitfall by ensuring ventilated spaces between the roof surface and the insulated area. This foresight not only preserves the integrity of the roof structure but also safeguards the health of those using the shed. When insulating, it is vital to maintain the cavities between rafters to allow air to circulate. The implementation of vents on both the high and low sides of the shed facilitates proper ventilation, reducing the risk of condensation and moisture buildup. The Process of Installing Foam Board Installing foam board insulation can be a straightforward process. As described by Scott, the key is to measure and cut the boards accurately to fit snugly between rafters. Using tools like an Olaf blade and GRK screws provides a quick and efficient installation method. Additionally, the use of specific washers enhances the security of the panels to the rafters, ensuring they remain firmly in place. It is critical to drill through the wood structure to create a reliable hold, as this can prevent air leaks that compromise insulation effectiveness. Sealing It Up: Importance of Joint Treatment Once the foam boards are installed, sealing the seams is crucial for achieving optimal insulation performance. Scott recommends using strong seam tape, which bonds effectively yet is easier to break off than traditional tape options. This detail might seem minor but pays off significantly by reducing gaps that could allow air and moisture to penetrate. Conclusion: Your Next Steps Towards a Well-Insulated Shed Properly insulating your shed can transform it into a versatile home office or relaxation space, free from the threats of moisture and mold. With insights from the video, “Most Homeowners Insulate Shed Roofs WRONG (Do This Instead),” you now have a roadmap to avoid common pitfalls and make informed decisions about materials and methods. Take advantage of community resources—many homeowners, including Scott, are eager to share their experiences and help others through the process. Don’t hesitate to reach out for further advice, and consider creating detailed plans and budgets before starting your insulation project. With the right preparation, your shed can become the ultimate functional area you’ve always wanted.

Terms of Service

Privacy Policy

Core Modal Title

Sorry, no results found

You Might Find These Articles Interesting

T
Please Check Your Email
We Will Be Following Up Shortly
*
*
*